Feb
17
2017Our aim is simply lighting up a single led using Raspberry Pi.
What we’re gonna need :
- Led
- Resistor (I use 330 Ω)
- 2 male to female jumper cable
- Breadboard
- Raspberry Pi and all its bits and pieces

A little theory about breadboard, before we start :
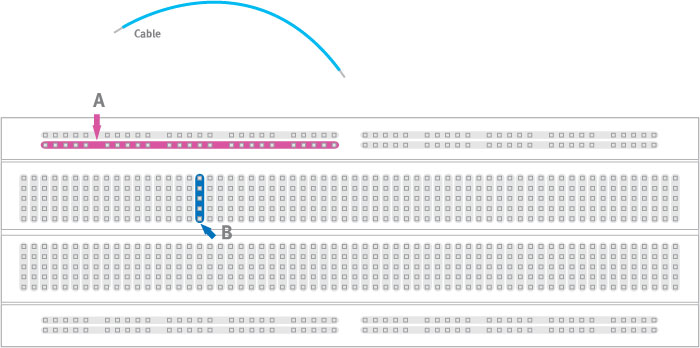
All the holes in row A are internally connected. And all the holes in column B are also internally connected. To interconnect the row A and column B, we use jumper cables. Learn more about it here.
Basically this is how we’re going to wire them up :
Read More»Feb
03
2017After all the required components for Raspberry Pi are gathered, it is time to give it some operating system. Raspbian, a version of GNU/Linux, is the recommended operating system to be installed on the Raspberry Pi.
![]()
How I got the Raspbian installed
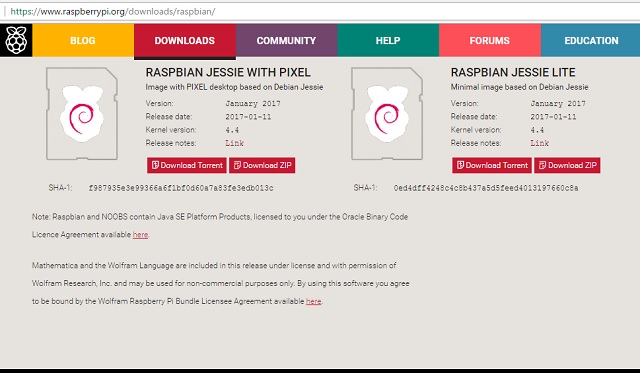
Raspberrypi.org provides the image file of Raspbian OS. You just need to download it from the website, and burn the image file on the micro SD card.
- Visit the download page of Raspberrypi.org.
- Click on RASPBIAN.
- I chose to download RASPBIAN JESSIE WITH PIXEL (image with PIXEL desktop based on Debian Jessie).
- Unzip the downloaded file.
- To burn the image file on the micro SD card, I used a program called Etcher. We can download it from etcher.io website.
- Once Etcher is installed, run it. Select the downloaded image file, and select the drive in which the micro SD is located. Then click Burn!
- The micro SD card is now loaded with Raspbian OS.


Recent Comments