Apr
09
2018Show gratitude with the submission, for whatever we may have gone through…
Jan
05
2018A short story : Merenung di sepanjang perjalanan dari satu ujung corniche menuju Lake Park, Abu Dhabi. Diabadikan dalam sebuah film pendek…
Transcript :
Ya namanya hidup…
Terkadang melalui jalan berliku
Suatu waktu mengalami masa yang suram
Ada kalanya harus berkejaran dengan waktu
Di saat lain kita mendapati kelapangan dan kemudahan
Namun ketika hari-hari penuh dengan kesenangan..
Jangan dikira cobaan tidak akan pernah kembali lagi
Ya nikmati saja…
Setiap fase hidup hanya perlu kita lalui
…dengan keikhlasan, dengan kesabaran, dan tak lupa bersyukur
Mar
16
2017This time we’re going to detect an input signal that comes into the pin of Raspberry Pi.
Few items we’re gonna need :
- Momentary Push Button
- 2 Female to Male Jumper Cables
- Raspberry Pi and required peripherals
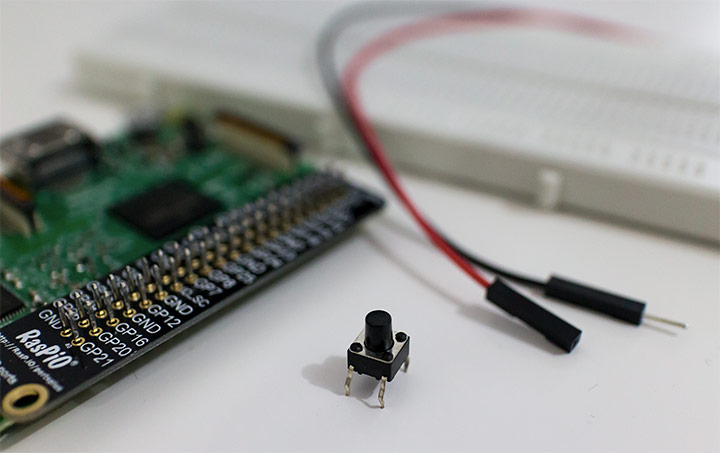
We’ll connect them all,
- Stick the button in the middle of the board
- Connect one leg of the button to the GPIO pin 17 using the red jumper cable
- Connect the other leg of the button the GND pin using the black jumper cable
Feb
17
2017Our aim is simply lighting up a single led using Raspberry Pi.
What we’re gonna need :
- Led
- Resistor (I use 330 Ω)
- 2 male to female jumper cable
- Breadboard
- Raspberry Pi and all its bits and pieces

A little theory about breadboard, before we start :
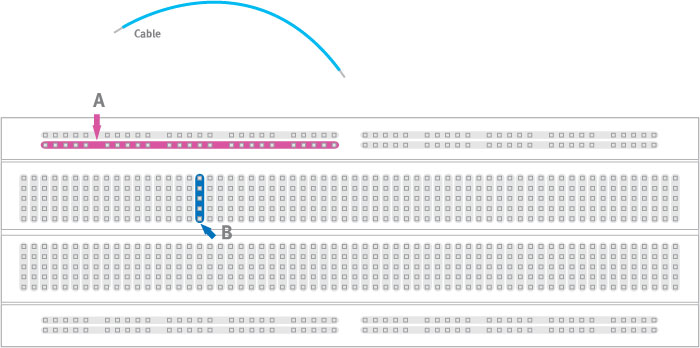
All the holes in row A are internally connected. And all the holes in column B are also internally connected. To interconnect the row A and column B, we use jumper cables. Learn more about it here.
Basically this is how we’re going to wire them up :
Read More»Feb
03
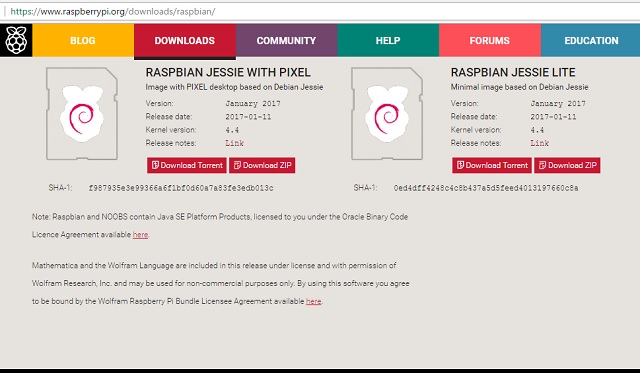
2017After all the required components for Raspberry Pi are gathered, it is time to give it some operating system. Raspbian, a version of GNU/Linux, is the recommended operating system to be installed on the Raspberry Pi.
![]()
How I got the Raspbian installed
Raspberrypi.org provides the image file of Raspbian OS. You just need to download it from the website, and burn the image file on the micro SD card.
- Visit the download page of Raspberrypi.org.
- Click on RASPBIAN.
- I chose to download RASPBIAN JESSIE WITH PIXEL (image with PIXEL desktop based on Debian Jessie).
- Unzip the downloaded file.
- To burn the image file on the micro SD card, I used a program called Etcher. We can download it from etcher.io website.
- Once Etcher is installed, run it. Select the downloaded image file, and select the drive in which the micro SD is located. Then click Burn!
- The micro SD card is now loaded with Raspbian OS.
Jan
25
2017
I was looking for diy project for NAS (Network Access Storage) when I came across many articles about building up NAS using Raspberry Pi. I read more and more about Raspberry Pi, and then realized that Raspberry Pi is more than a just small sized computer as what I’ve thought earlier.
Basically, Raspberry Pi is a credit card-sized single-board computer, but with the GPIO (General Purpose Input/Output) on the board, it opens up lots of possibilities of diy electronic projects.
In order to get started with the Raspberry Pi, you will need,
Read More»


Recent Comments